(Part 1) How to configure social authentication in a Next.js + Next-Auth + Django Rest Framework application
9 min read
This is the first part of a two-part series where I show you a way to connect your Django Rest Framework backend with a Next.js + Next-Auth app.
Introduction
Authentication has always been a gigantic pain in the you-know-where, at least for me. I come from a Node.js, Express.js background, where I used passport.js to handle authentication schemes. I started learning Django and Django Rest Framework (DRF). However, Django (and DRF, for that matter) does a lot of heavy lifting behind the scenes, which is why it seems quite perplexing (again, most likely only to me) to do many things. Not to mention that one of my acquaintances actually said it out loud that:
Django OAuth schemes kinda seem shady at times
And I kind of have to agree to that, as I tried a bunch of different solutions and none of them worked perfectly the way I wanted them to. That is why I sat down a few hours ago to embark on a mission to find out once and for all whether what I want to do is actually possible:
Is it possible to use a Next.js frontend with Next-Auth for the authentication, but at the same time have a separate backend (in my case, DRF) so that I can essentially have the best of both worlds in my web application?
Okay, but how?
For this tutorial, we will set up a basic DRF application to serve as our backend and later have a Next.js application communicate with it. Since Next-Auth does a really nice job of hooking up Social Authentication with your Next.js app, we want to be able to keep that flow, and make the DRF backend takeover when we want it to. Essentially, Next-Auth will act sort of like a middleman between the Next.js app and the DRF backend. We will use Google Sign-in as part of the example, but other providers should follow a similar approach. So, let’s get started!
The Flow
 |
|---|
| The entire application flow |
Project structure
I will be on a Ubuntu 20.04 machine, however the OS should not be of any importance. Let’s setup a basic folder structure. The names of the folders are self-explanatory.
$ cd Documents/Code # or wherever you prefer keeping your code files
$ mkdir -p next-js-with-drf/client next-js-with-drf/backend
$ tree next-js-with-drf  # a handy tool to inspect folder structures
next-js-with-drf
├── backend
└── client
Backend
For the backend, we need to install quite a few packages. I am assuming you know already how to spin up a virtual environment and setup a basic Django application. I prefer using conda, but you can use virtualenv as well.
$ conda create -n next-js-with-drf python=3.7
... (truncated output)
Preparing transaction: done
Verifying transaction: done
Executing transaction: done
#
# To activate this environment, use
#
#     $ conda activate next-js-with-drf
$ conda activate next-js-with-drf
Then, we need to install the required packages:
$ pip install django djangorestframework django-cors-headers dj-rest-auth django-allauth djangorestframework-simplejwt
- Django and DRF are obvious
- Django CORS Headers: Needed to allow cross-domain communication (e.g. DRF backend running on
http://127.0.0.1:8000can’t be readily accessed by Next.js frontend running onhttp://127.0.0.1:3000) - DJ Rest Auth: API endpoints for RESTful authentication
- Django AllAuth: For Authentication using Social Accounts (in this example, Google)
- DjangoRestFramework SimpleJWT: Needed to issue
access_tokenandrefresh_tokenwhen a user logs in/signs up.
After the packages finish installing, let’s setup our Django project.
$ cd next-js-with-drf/backend
$ django-admin startproject nextjsdrfbackend .
$ django-admin startapp nextjsdrfauth
$ cd nextjsdrfbackend
$ touch secrets.py secrets.example.py
$ tree ../
../
├── manage.py
├── nextjsdrfauth
│   ├── admin.py
│   ├── apps.py
│   ├── __init__.py
│   ├── migrations
│   │   └── __init__.py
│   ├── models.py
│   ├── tests.py
│   └── views.py
└── nextjsdrfbackend
    ├── asgi.py
    ├── __init__.py
    ├── secrets.example.py
    ├── secrets.py
    ├── settings.py
    ├── urls.py
    └── wsgi.py
3 directories, 15 files
Now, we need to modify our root settings.py inside the project folder. I usually create a secrets.py file and a secrets.example.py file to keep the secrets (e.g. keys) away from version control, with the second file serving as an example file for those who would be, for example, cloning the repository so that they can set it up properly for themselves. secrets.py , obviously, would therefore be included in the .gitignore file.
# nextjsdrfbackend/secrets.example.py
DJANGO_SECRET_KEY = "your django secret key"
JWT_SECRET_KEY = "your jwt signing secret key"
This is our settings.py after all the modifications. Take note of Lines 91, 94 and 95. Be sure to name your custom user model and its corresponding serializer class the same way as you type in here.
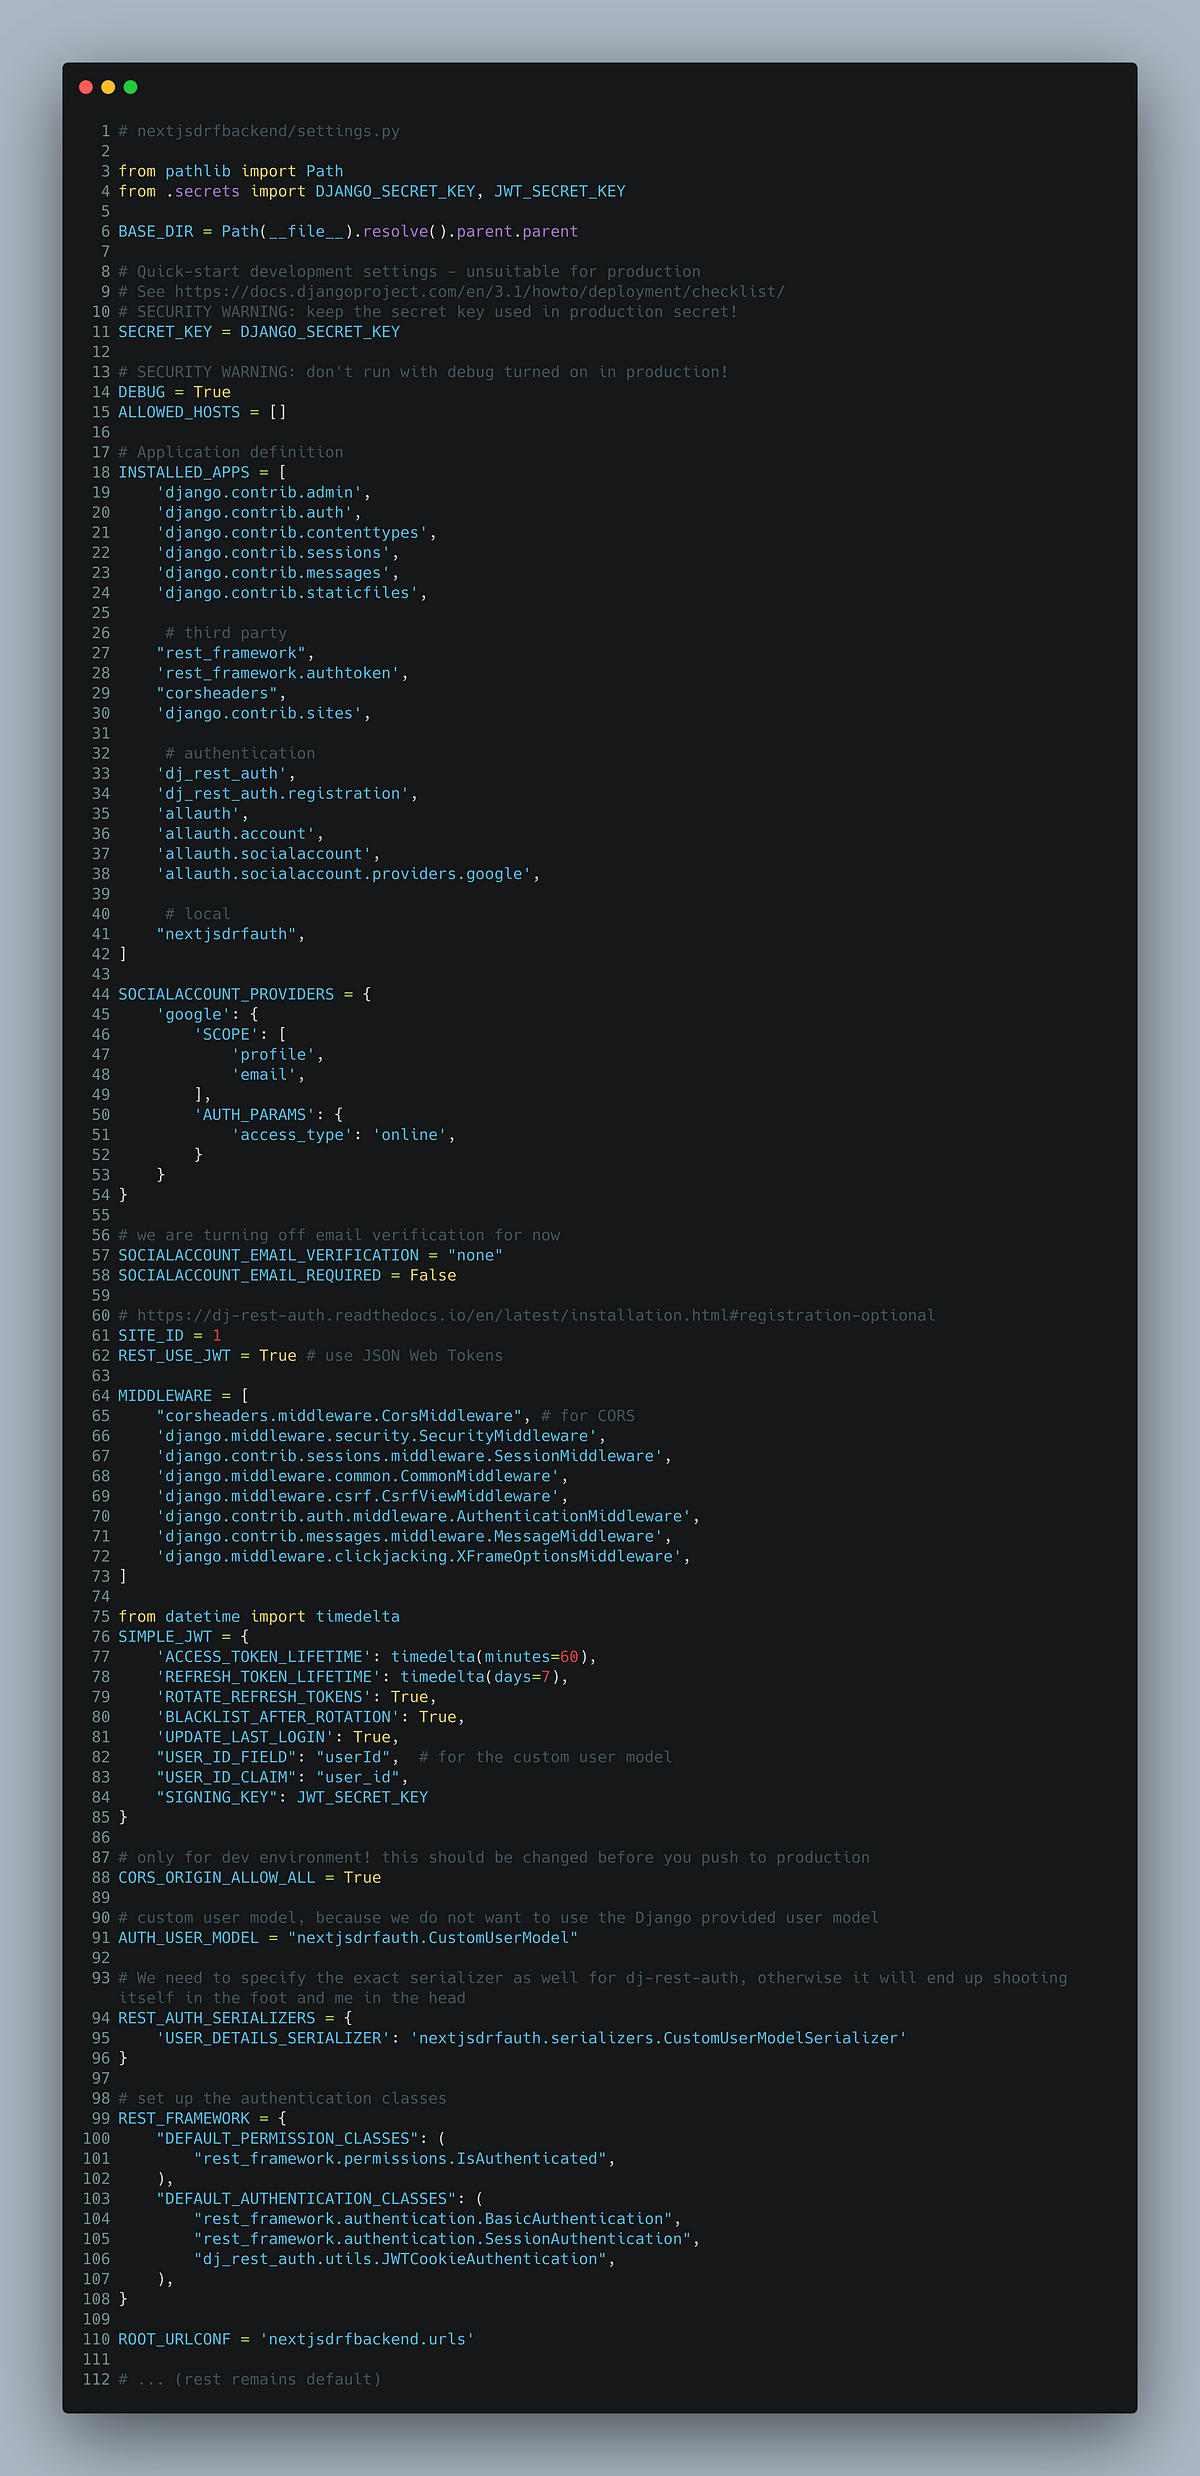 |
|---|
| backend/nextjsdrfbackend/settings.py |
Now, let’s create our custom user model in nextjsdrfauth/models.py
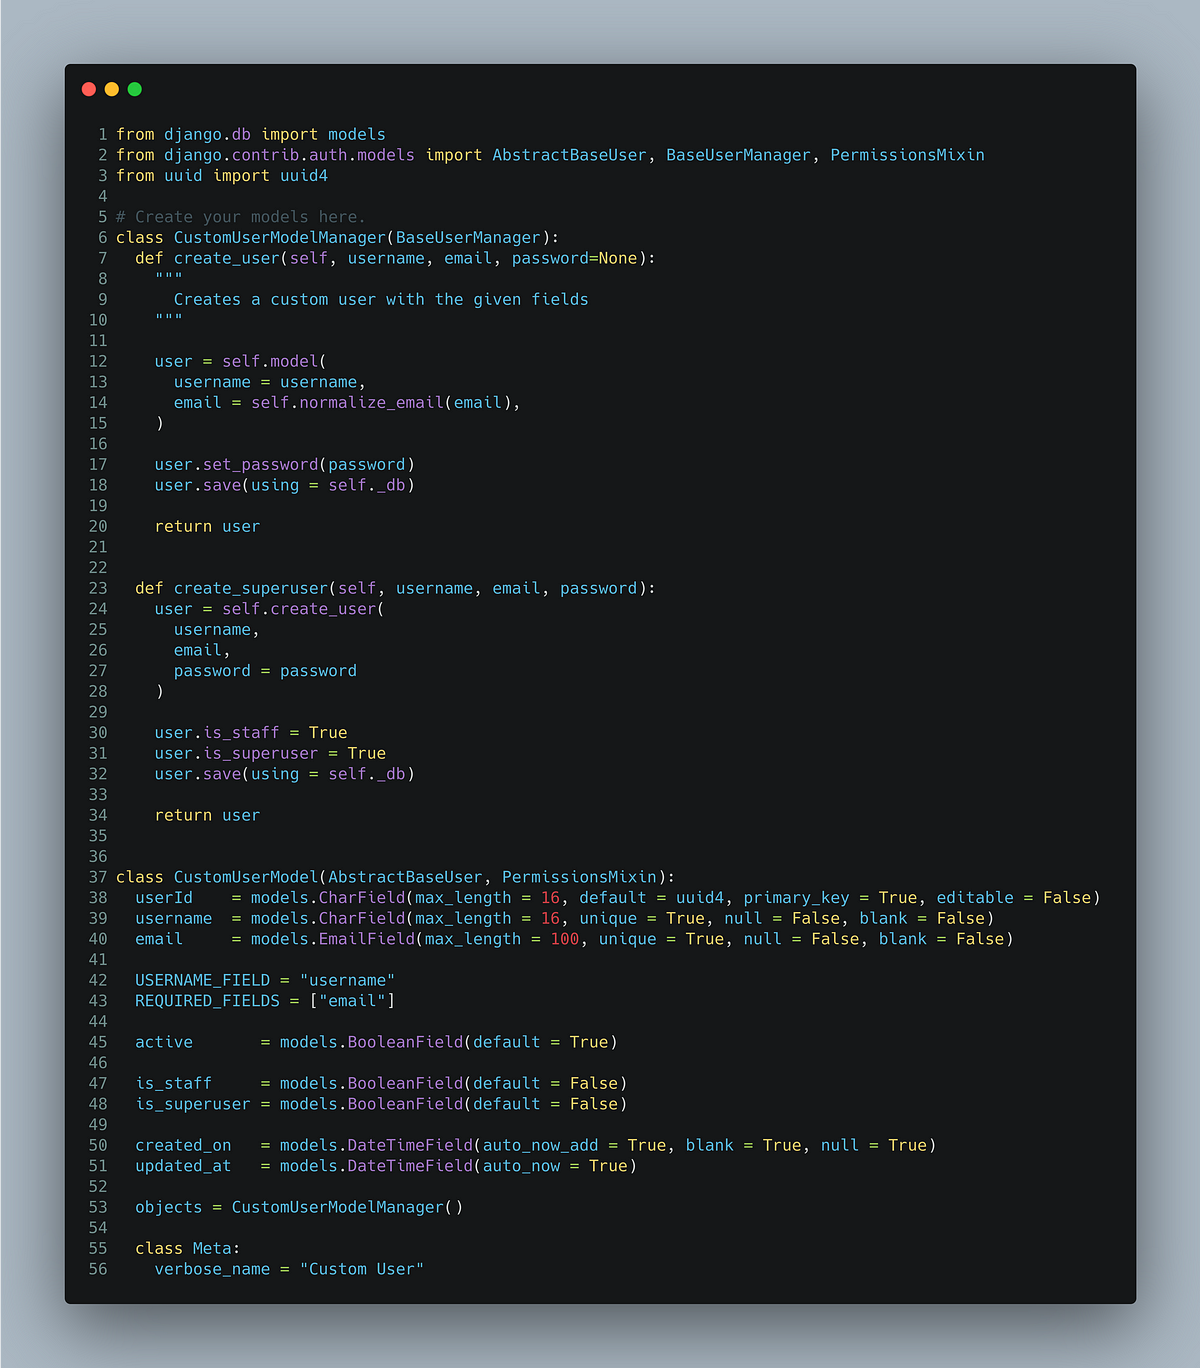 |
|---|
| backend/nextjsdrfauth/models.py |
And our CustomUserModelSerializer in nextjsdrfauth/serializers.py.
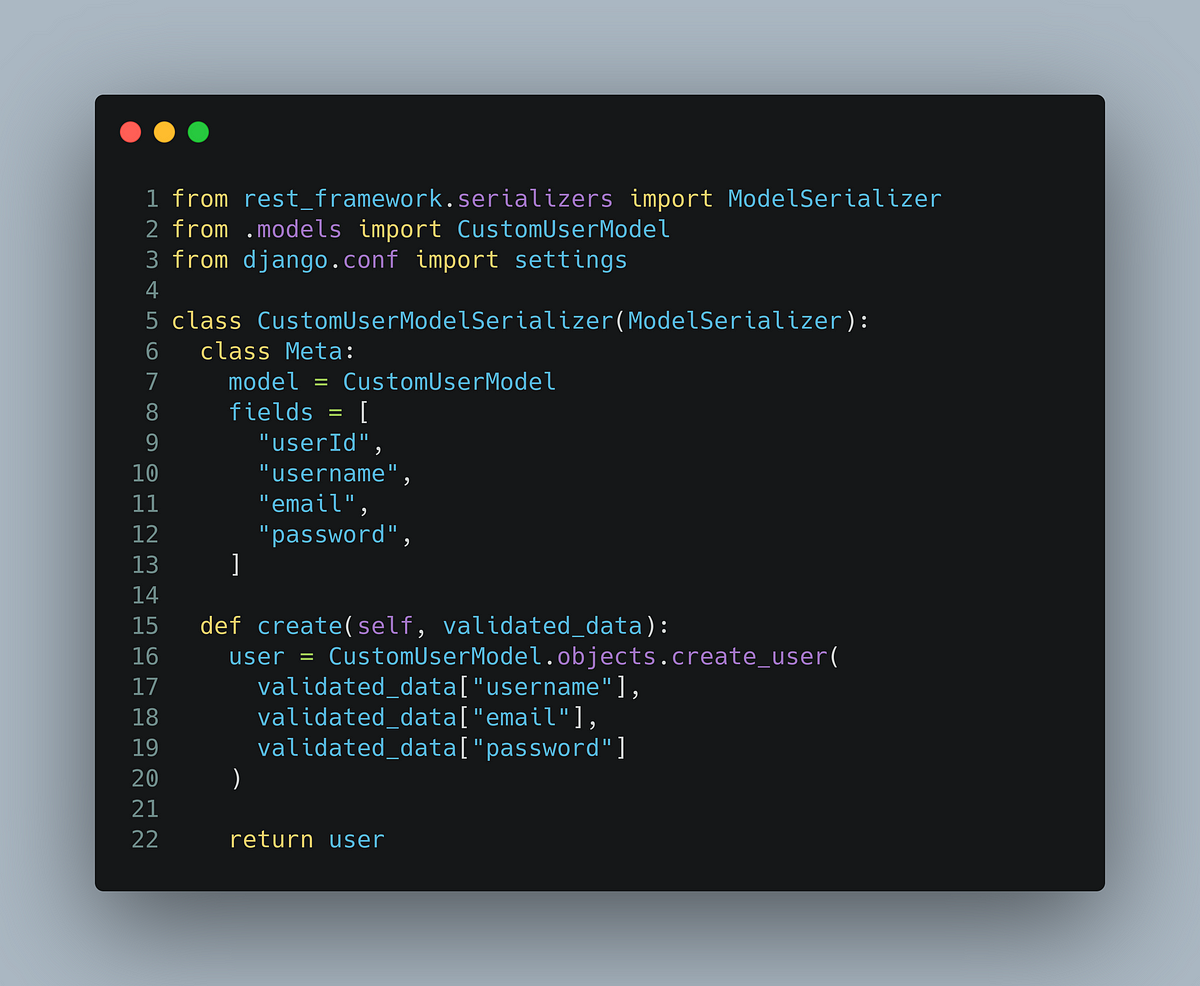 |
|---|
| backend/nextjsdrfauth/serializers.py |
At this point, you can make migrations and create a Django admin/superuser. You can change up the database backend if you want to, but it is not really a concern for this tutorial.
$ python manage.py makemigrations
Migrations for 'nextjsdrfauth':
  nextjsdrfauth/migrations/0001_initial.py
    - Create model CustomUserModel

$ python manage.py migrate --run-syncdb
Operations to perform:
  Synchronize unmigrated apps: allauth, corsheaders, dj_rest_auth, google, messages, registration, rest_framework, staticfiles
  Apply all migrations: account, admin, auth, authtoken, contenttypes, nextjsdrfauth, sessions, sites, socialaccount
Synchronizing apps without migrations:
  Creating tables...
    Running deferred SQL...
Running migrations:
  Applying contenttypes.0001_initial... OK
  Applying contenttypes.0002_remove_content_type_name... OK
  Applying auth.0001_initial... OK
  (...truncated)

$ python manage.py createsuperuser
Username: nextjsdrfexample
Email: nextjsdrfexample@xyz.com
Password:
Password (again):
Superuser created successfully.
Now, we would like to wire up the view for our Google Signup.
 |
|---|
| backend/nextjsdrfauth/views.py |
With the view created that will be used by our frontend application to exchange access_token for the tokens obtained from Google after user authorization, it’s time to wire up the URL endpoints. I prefer having api/* prefix for REST endpoints, but you may use a different scheme if you want to.
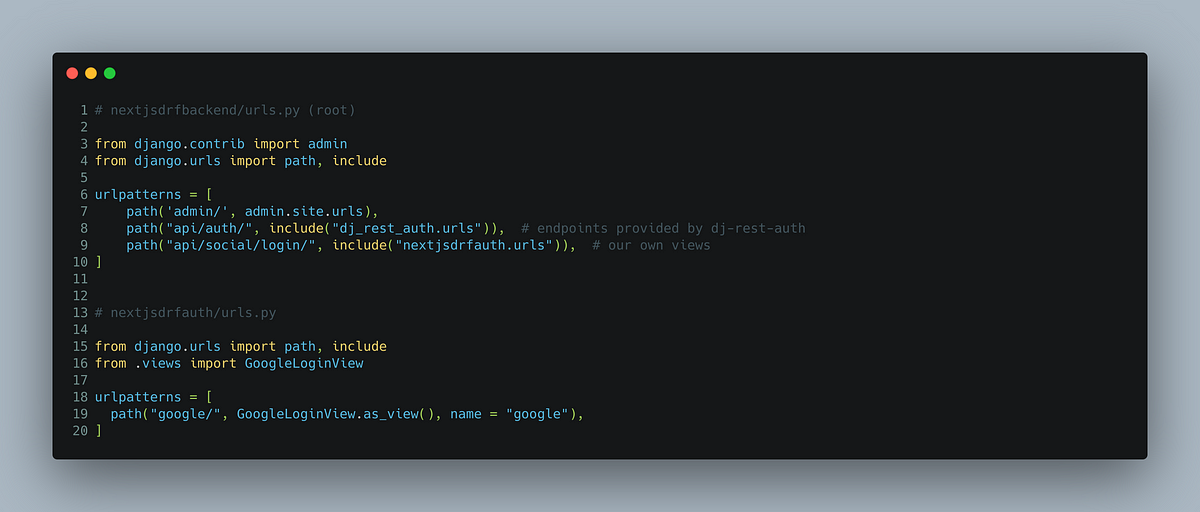 |
|---|
| urls.py files for the project (top: nextjsdrfbackend) and app (bottom: nextjsdrfauth) |
Lastly, we need to setup the Google application in the admin panel of Django. Before this, head over to the Google Developer Console, create a new project and generate the OAuth Client ID (namely, CLIENT_ID and CLIENT_SECRET). You may have to add a few test users while in development phase as per Google’s new policies.
Make sure to choose Web Application as the Application Type and put http://127.0.0.1:3000/api/auth/callback/google under Authorized redirect URIs section, since that’s the default URL Next-Auth uses.
Now, head over to the Django admin and create a new Social Application. Follow the image below.
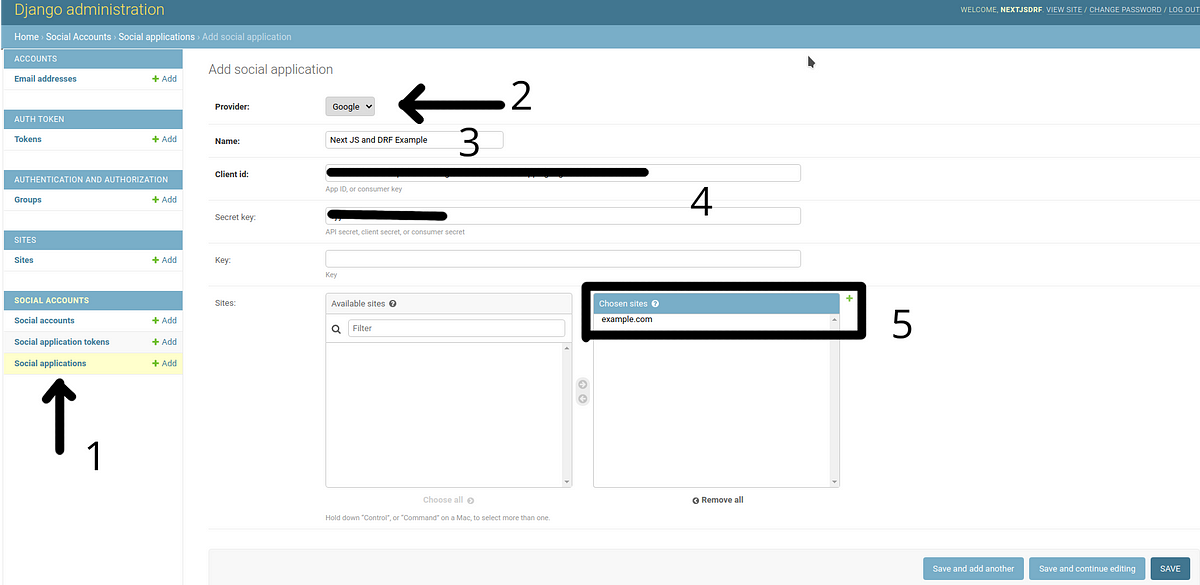 |
|---|
| Creating the new Social application using the OAuth Client ID we just obtained. Make sure to include example.com under the Chosen sites. This will change when you push to production, of course. |
Right now, we are pretty much done with the backend. Now we need to setup the frontend client using Next.js and Next-Auth.
Frontend
Start by creating a new Next.js app. I will use yarn , but npm works as well. Make sure to have at least the latest LTS version of Node.js installed on your machine. We will also use TypeScript, so I will perform some additional steps pertaining to the TypeScript setup.
$ cd next-js-with-drf/client
$ yarn create next-app .
yarn create v1.22.5
[1/4] Resolving packages...
[2/4] Fetching packages...
[3/4] Linking dependencies...
[4/4] Building fresh packages...
(...truncated for brevity)

$ yarn add axios next-auth

$ touch tsconfig.json
$ yarn add --dev typescript @types/node @types/react @types/next-auth
After this, rename the .js files inside pages folder to .tsx. Now, your client folder should have the following structure. I also deleted the pages/api folder, but we will be recreating it in a bit.
$ tree -L 2 .
.
├── node_modules
│   ├── anser
│   ├── ansi-regex
... (truncated)
├── package.json
├── pages
│   ├── _app.tsx
│   └── index.tsx
├── public
│   ├── favicon.ico
│   └── vercel.svg
├── README.md
├── styles
│   ├── globals.css
│   └── Home.module.css
├── tsconfig.json
└── yarn.lock
Now, you can start the development server using yarn dev.
Setting up .env.local file
Create a .env.local file and a .env.example file in the root of the client folder. We will fill the .env.local file with the following information (and add it to .gitignore). The .env.example file will contain the key names so that anyone cloning the repository can know what environment variables are needed to run the application.
// .env.local
// would be changed in production
NEXTAUTH_URL=http://127.0.0.1:3000

GOOGLE_CLIENT_ID=<client id obtained from Google Developer console>
GOOGLE_CLIENT_SECRET=<client secret obtained from Google Developer console>
Setting up the views
Replace the contents of pages/index.tsx with the following code.
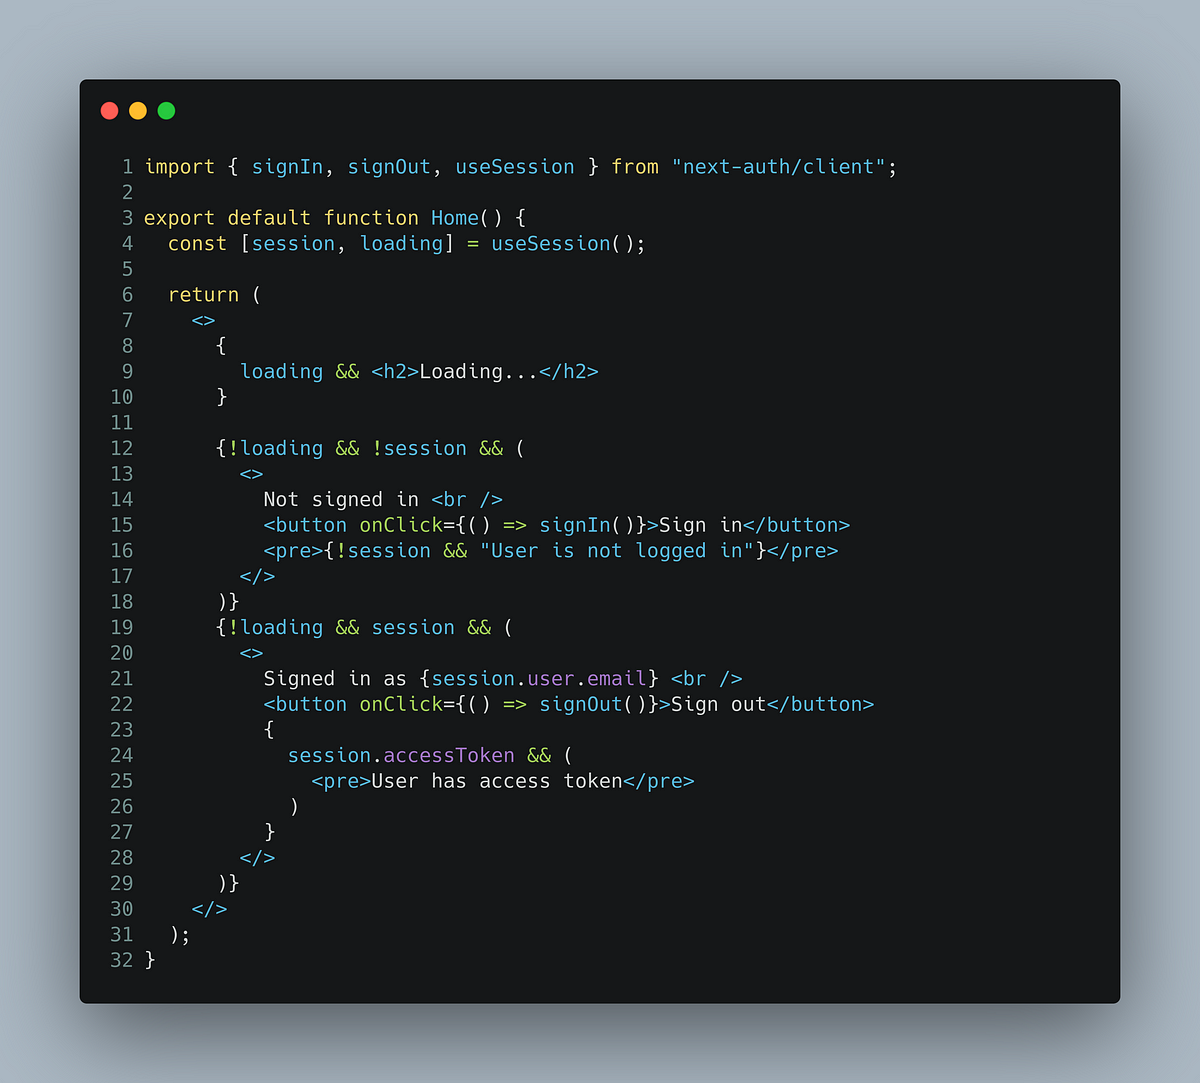 |
|---|
| client/pages/index.tsx. |
Setting up Next-Auth
Now, we can create pages/api/auth/[...nextauth].ts and add the following code into it.
![client/pages/api/auth/[…nextauth].ts](/blog/post-1/nextjs-drf-auth-code-8.png) |
|---|
| client/pages/api/auth/[…nextauth].ts. |
At this point, you should be able to sign in with your Google account using the frontend application.
Intercepting the tokens returned by Google and obtaining access_token from the DRF backend
By default, Next-Auth uses the tokens returned by Google to authenticate the user and allow access to protected content on the frontend. But, we want to exchange the tokens obtained with our DRF backend so that we can actually create the user in our database.
This will be done inside our [...nextauth].ts file, using the methods we specified under the callbacks object earlier. Replace the code in that file with the following:
![client/pages/api/auth/[…nextauth].ts after update](/blog/post-1/nextjs-drf-auth-code-9.png) |
|---|
| client/pages/api/auth/[…nextauth].ts after update |
I also created a types.ts file at the root of the client folder and added the following few lines just so that TypeScript knows that I know what I am doing when I modify the user object.
import { User } from 'next-auth';

export interface AuthenticatedUser extends User {
  accessToken?: string;
  refreshToken?: string;
}
With that set up, you are all done! Head over to your frontend, and now you should be able to sign in with Google. You can also check in your Django admin console that the new user is being correctly created in your database with the custom user model that you specified earlier.
Conclusion
In this tutorial, we learnt how to consume a DRF API with a Next.js application using Next-Auth. We have only scratched the surface of the things you can do. Now, there are a few caveats. But most important one would be that the access_token from the DRF backend are not being sent as a HttpOnly cookie. Additionally, the DRF endpoint will also send a refresh_token , and there is a DRF endpoint at api/auth/token/refresh/ where you can exchange the refresh_token for a fresh access_token . These are the two things that I would like to explore in a sequel to this post.
The code will be available at https://github.com/mahieyin-rahmun/NextJsWithDRFExample for anyone who wants to fiddle around with it.
Go beyond!